— Managing Files in Your EPUB —
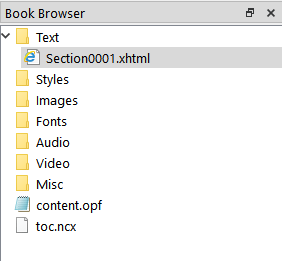
All of the files that make up your EPUB can be viewed and accessed using the Book Browser.
You will find the Book Browser docked on the left side of the default user interface. You can control whether it is visible or hidden via menu item . You can also drag it to a different location if you prefer.
Click on the little arrow or plus sign to the left of the folder’s name, or double-click on the folder, to expand or collapse it.
Double-click on a file to open it in a tab in the Code View window. If it was already open, the view will switch to the tab containing the file. The Book Browser will always highlight the active file/tab displayed in the Code View window.
Right-click on a filename or folder to display a context menu of options.
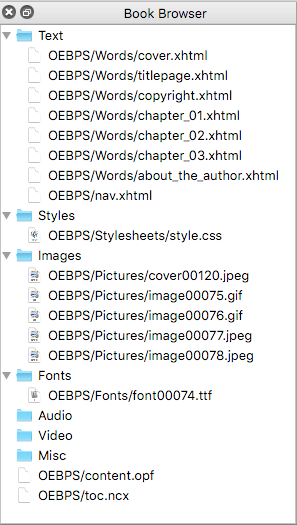
The Book Browser organizes your files into several virtual folders by file type (text, stylesheets, images, fonts, etc.). It is important to keep in mind that starting with Sigil 1.0, folders and their contents are displayed in this manner for ease of editing/multi-selection. The Folder text/name does not reflect the actual folder name of the actual folders inside your EPUB. For example, a nav.xhtml file will be displayed in the virtual Text folder with all the other XHTML files, even if it’s in a different actual folder inside the EPUB.
To see the full filepath and actual folder names, hover your mouse over a file. If the file has a guide semantic type or manifest property, it will also be revealed.

Hovering your mouse over a folder shows the actual folder name, full filepath, and number of files in the virtual folder.

To always show full filepaths in the Book Browser, go to and select “Book Browser should show full paths”.
The virtual folders and the file types they contain are:
Text: The XHTML, HTML, and, HTM files that make up the text of the book.
Styles: The CSS stylesheets that control the formatting of the book.
Images: The PNG, JPEG, GIF, SVG, and all image files in the book.
Fonts: The TTF, OTF and any other embedded fonts that might be in the book.
Audio: The MP3, AAC, MPG, MPEG, M4A and any other embedded audio files that might be in the book.
Video: The MP4, OGG, WEBM, M4V and any other embedded video files that might be in the book.
Misc: Other files that are typically used by EPUB readers and are stored with the book. This includes things like javascript (JS) files, SMIL files, and other pure XML files.
No virtual folder: The NCX (.ncx) and OPF (.opf) files are not placed in a virtual folder. The NCX contains a an EPUB2 readable table of contents of the book (required for EPUB2, optional for EPUB3). The OPF contains a list of files in the book (manifest). It also holds the book metadata, and determines chapter display order (spine), and some semantic data. The OPF is basically the controlling document for the EPUB.
Prior to version 1.0, Sigil automatically restructured each EPUB into a standard Sigil form. As a result, the names of the folders in the Book Browser always matched the actual folders used. Sigil 1.0 no longer does this. Sigil 1.0 loads EPUBs as they are without moving files or renaming folders, and allows you to structure your EPUBs and name your folders as you please. However, if you prefer the old standard Sigil form, you can restructure your EPUB using menu item .
Select multiple consecutive files in a folder by clicking on the first file that you want, then hold down the Shift key while clicking on the last file. All files between and including the first and last clicked will be selected. To select (or add) non-consecutive files, hold down the Ctrl key (on Mac: Cmd key) while clicking individual files. You can also use right-click to call up the context menu and choose to grab all of the files in a folder in one go. (Note: You can only select multiple items within the same folder (ie. of the same type).
Once you have selected your files, you can use the right-click context menu to perform actions on the selected files.
The order of the files in the Text folder is important since it is the order in which the files will be listed in the OPF (.opf), which is the order they will be displayed to readers.
Files in the Text folder can be dragged up or down, allowing you to re-order files quickly and easily. When you change the order of these files in the Book Browser, the OPF is automatically updated. However, the NCX and/or EPUB3 NAV (nav.xhtml) are not updated automatically. For more on updating the table of contents files, see the Table of Contents chapter.
You can also use the context menu to rename the files.
Files in all other folders are automatically sorted alphabetically and cannot be rearranged. The order of their files does not affect how your book is displayed.
Right-clicking on one or more items in the Book Browser brings up a context menu with relevant actions. Different context menus will appear depending on whether you’re clicking on a text file, stylesheet, image, folder, etc.

Available context menu commands include:
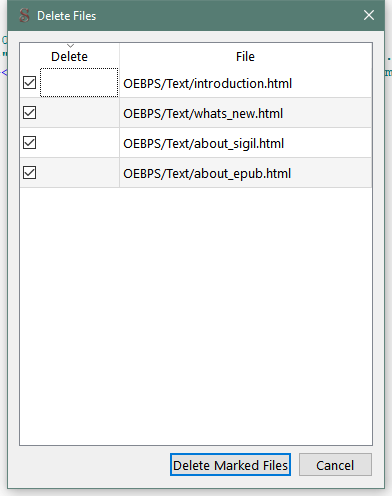
Delete the selected file(s). (You cannot delete the last remaining HTML file.)
You will be prompted to confirm that you want to delete the files since the action cannot be undone.
Remember to update or regenerate the Table of Contents if your file was included in the TOC.
If you select a single file to rename, the name of the file will be highlighted so that you can type in a new name. By default the extension is not highlighted to make renaming easier, but you can also change the extension if necessary.
If you select multiple files, a dialog is displayed asking you how you want to rename the files:

Enter a new name for the first file, including a starting number at the end of the name. Sigil will rename each of your files sequentially using the name you provided and starting at the number you provided. A file will not be renamed if it would result in the book having duplicate file names. You can also rename the extension.
For example, if you start with the original names: Section0001.html, Section002.html, Section0003.html … then:
When you rename a file, any links pointing to the file in your EPUB will be automatically updated.
A more powerful renaming tool, ReGex Rename allows you to use regular expressions to find and replace text in filenames.
Select the files you want to rename, right-click to choose , and the RE File Renamer dialog box will appear. Input the regular expression you are searching for and the text you want to replace it with, then click .

The Rename Table will show you the old and new filenames. If the new names are acceptable, click to rename your files.

Move the selected files to a different folder.
When you invoke , a dialog box opens and offers a dropdown menu of existing folders to choose from.

You can also type a new name directly in the text box to create a new folder to move your files into.

Press to execute the move.
If you select a single HTML file, then the file will be merged into the previous HTML file in the list.
If you select multiple HTML files, then all files will be merged into the first HTML file you selected.
You can also use the Merge keyboard shortcut. See the Splitting and Merging chapter for more details.
Sort the selected HTML files alpha-numerically. This means filenames containing numbers will be sorted in their expected numerical order, e.g. “1, 3, 2, 10” will be resorted as “1, 2, 3, 10” rather than “1, 10, 2, 3”.
Link stylesheets to the selected HTML files. Choose the stylesheets from the dialog window. Only stylesheets marked with a checkmark will be linked; unchecked stylesheets will be unlinked.

When the dialog is first opened a checkmark is shown against stylesheets only if all selected files are linked to that stylesheet.
Stylesheets are applied in the order listed when the document is rendered.
Link existing javascript files to the selected HTML files (EPUB3 Only). Choose the javascript files from the dialog window. Only javascripts marked with a checkmark will be linked; unchecked javascript files will be unlinked.
Add Semantics allows you to designate the semantic type for selected files from a scrolling list of choices. EPUB ereaders may use this information (stored in the .opf file in EPUB2 and .opf and nav files in EPUB3) to guide them in how to present these files to readers. Each file can have only one semantic type.

(EPUB2) or (EPUB3) should be used to indicate the page of the book that should be shown when the book is first opened, though not all ereaders follow this convention.
Open the file in an external application, such as a photo editing program or your favorite HTML editor. For more information, see the External Editors chapter.
Save the selected files to your computer. This is useful if you need to access the files outside of the EPUB.
Add a blank HTML file, CSS stylesheet, or SVG image file to the appropriate folder. For HTML it will add the file just below the one you right-clicked on, or at the bottom of the folder if you right-clicked on the folder name. For other folders it will add the file in alphabetical order.
The new file will be numbered with the lowest available number starting from 0001 (e.g. Section0001.html). You can then rename it.
This context menu command is the same as the main menu item .
To use your own custom HTML file or CSS stylesheet, simply create your files then name them: “user-template2.xthml” and “user-template2.css” for EPUB2, and “user-template3.xhtml” and “user-template3.css for EPUB3. Then place the files in the Sigil Preferences folder (in Windows: , on Mac: , then click the button and copy the files into the folder). Now, whenever you Add Blank HTML File or Add Blank Stylesheet, your custom template will be inserted.
Create a copy of the HTML or CSS file you clicked on and add it to the folder.
Add a file that resides on your computer outside of the EPUB.
A dialog window will open allowing you to choose one or more files from your computer to import into your EPUB. Files will be added to the appropriate virtual folder based on their file extension, regardless of what file or folder you right-clicked on.
This is the same as the main menu item and the toolbar button.
A quick way to select all of the files in the current folder so you can rename, link, etc. all of them at once.
If you right-click on a CSS stylesheet and select , Sigil will open a browser window and send your stylesheet data to the W3C Validation Service, which will then show validation results for the selected stylesheet. (If an HTML editor opens instead, open the resulting HTML file in a browser. This may happen if you’ve set HTML files to open in an editor instead of a browser.)
Add the “cover” semantic designation to the selected image.
If you are using custom fonts in your ebook, right-clicking on a font file will allow you to define how the embedded fonts are stored in the EPUB. Normally when fonts are added to an EPUB the fonts are stored in a readable form. In some cases you may not want to make the fonts available for readers to access directly. In these cases you can obfuscate or scramble the fonts in the ebook so that readers cannot access the fonts, but the fonts will still be useable by EPUB ereaders. The details of obfuscation and its implications are beyond the scope of this guide, but there are many references to it on the web.
The obfuscation options are:
Renumber the playOrder and navPoint id numbers of the Table of Content entries in the .ncx file sequentially, starting from 1. This feature is intended to clean up the TOC numbering if you have to manually add or delete an entry in the TOC.
You can also use the menu item or button. Simply saving the TOC will automatically renumber the ids.
Any navList or pageList items in the file are not saved – only the Table of Contents entries are saved after renumbering.